HandyAvi® - How to Capture Lightning Tutorial
HandyAvi® can receive video from a wide range of video devices: Webcams, HD cameras, Video boards, local and remote IP cameras, etc. Nearly all cameras follow the Microsoft DirectShow interface standards and include a DirectShow driver. HandyAvi can receive video from any such driver as long as the camera can transmit JPEG or MJPEG video. In addition our IP Camera Filter allows HandyAvi to receive video from any IP Camera on a local area network or on the internet to be received so long as the camera is capable of transmitting JPEG or MJPEG video images.
For lightning, we will be using the Meteor-detect subsystem. This allows a camera to be pointed at a scene and capture video images ONLY when something in the scene becomes brighter, e.g., a lightning stroke occurs. No images are captured if the camera sees no changes in the image.
What you need to get started
1. A webcam
Almost any webcam will work. Lightning is so bright that there is no need to have a highly sensitive camera.
3. A USB/Video adapter (or suitable video board)
HandyAvi can see cameras connected via USB. A USB/Video adapter plugs into your computer's USB port. The other end of the adapter plugs into your camera.
HandyAvi can also see various video boards installed on your machine and the camera could be connected to a video board input port. You should test this though to be sure that HandyAvi can see your particular board. (We think it will but we can't afford to buy and test all of them. It has worked fine for the WinTV boards we have here.)
4. A copy of HandyAvi
Download and install HandyAvi. Use the 10-day free trial period to begin working with handyAvi.
After the 10-day free trial period expires, you will need to purchase a HandyAvi license. Install the registration key by running HandyAvi and choosing the Help menu item "Install Registration Key". (The "trial version" is the actual version of HandyAvi so no additional download will be necessary. Simply install the key.)
Capturing Lightning
1. Turn on your PC
2. Plug your camera in
Either to a video adapter that is plugged into one of your computer's USB ports, or to a video board installed on your machine that HandyAvi can see and control.
3. Start HandyAvi if you have not already done so
4. Select the menu item "Capture" and then the sub-menu item "Meteor Trail Images...".
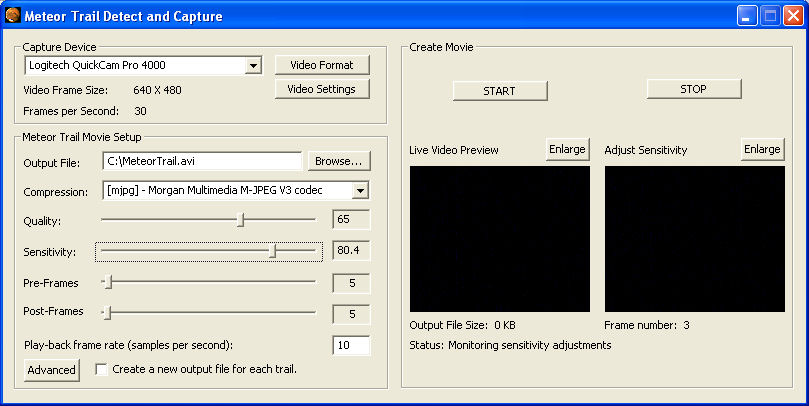
This will bring up the "Meteor Trail Detect and Capture" window:
Depending on how many cameras you have, you might need to select your "Capture Device" (webcam) from the pull-down item. (We selected the Logitech QuickCam Pro 4000 Camera for this example.)
Use "Video Format" to set the image size for your camera. (We selected 640x480 for this example.) The camera's "Frame Rate" can be selected in this panel. (We selected 30 frames per second for this example.)
The "Live Video Preview" window will be showing the sky assuming you have the camera pointed at the sky. If it is pointed where the lightning will occur that will help.
Use "Video Settings" to access the camera's Brightness, Contrast, Saturation, etc. controls. You should set brightness so that you will get good contrast between the sky and lightning strokes. The camera's frame rate can sometimes be selected from the Settings" panel in addition to its being selected in the "Video Format" panel. You should adjust the video settings so that you see the best possible images in the "Live Video Preview window. You can click "Enlarge" and adjust the image size so you can see in detail the quality of the images. When images are captured (using the Start button which will be described below) you want the best possible images to be captured.
Note that we bring up the camera vendor's "Video Format" and "Video Settings" windows. HandyAvi does not have its own settings windows for these because each camera is different and each camera generally comes with drivers that allow us to display the vendor's settings that are appropriate for their particular camera.
Be sure to focus the camera. You might want to "Enlarge" the video preview window and set it to "Size/True Image Size" to make it easier to focus the camera.
5. Set up for making your movie
First choose the name of your output file by entering a full path name such as the one shown in the example above. The Browse button will bring up a file selection window if you would prefer to use it. (We are showing "Mars" in the image above. You might want to make a folder called "lightning" and use that...
Then choose your compression scheme or "CODEC" from the CODECs that exist on your machine (HandyAvi "enumerates" them and lists them in the pull-down.) A CODEC will "compress" each of your images, i.e., make them smaller. There is a trade-off between compression and fidelity. High compression makes an image fuzzier typically. However, you can achieve good compression without noticably affecting the image. Some amateur astronomers we know use "Microsoft MPEG-4 Video Codec", MP42. (We usually avoid "Cinepak Codec by Radius" because we have seen it behave badly.) More CODECs can be obtained and downloaded from the internet. Check out: http://www.fourcc.org.
We usually use one of the MJPG compressors such as the PicVideo MJPEG CODEC which compresses each image using JPG compression. You typically have to buy an MJPG CODEC via the internet though. The freeware K-Lite CODEC Pack contains a lot of CODECs. You might find a suitable CODEC in their collection.
If you want images with NO compression you can use "Uncompressed". Your files will be very large if you use "Uncompressed" however.
Set "Sensitivity." If "Start" has not yet been pressed (or if "Stop" has been pressed) then the "Frame number" counter will count up if the sensitivity is set too high. You want to set it as high as you can without it counting up just because of camera noise in the image. You want to make it sensitive enough to record lightning but not record simple image noise. (Our "Philips SPC 900NC" can work with a sensitivity setting of 80 or so without triggering on noise. Your results may vary.) Pressing "Stop" will reset the counter to zero and display one frame.
Set Pre-Frames and Post-Frames
Pre-Frames is the number of frames you would like to capture BEFORE the lightning trigger event. When lightning occurs, it might start out with a dim stroke, then brighten, then dim. The capture system triggers when the stroke is bright enough. In order to not miss the beginning of the lightning event, you can set Pre-Frames to some number of frames to capture BEFORE the trigger event occurs.
Similarly, Post-Frames are the number of frames to capture after the stroke has dimmed below the detection criteria so that you can capture the end of the stroke without missing anything.
The default values for Pre-Frames and Post-Frames is 5 which often is sufficient. Higher or lower settings can be set of course. Higher settings require more memory for internal image buffers.
HandyAvi uses a sophisticated buffering system to allow images, pre-frames, and post-frames to be captured without slowing down or missing frames.
Choose your "Playback frame rate".
This will tell your movie how many frames per second to display if you choose to run your movie.
Create a new output file for each lightning event
When this is checked, a new file will be created for every lightning event detected.
Create a JPG file for each composite image
Whenever a lightning stroke is detected, each frame of the captured data will appear in real-time in the "Last Captured - Composite" window. After the last captured image of a lightning event is displayed, the system will display a "composite" image which contains the lightning event. Each of the images of the lightning strokes are combined into a "composite" image showing the whole event. This image will appear in the "Last Captured - Composite" window.
You can save each composite window as a JPG file by checking the "Create a JPG file for each composite image" checkbox. This can be of value when you are wondering if your movie contains any particularly interesting lightning events. You can look at each composite image to see each lightning event that was captured in your movie file.
6. Advanced button
This will bring up an "Advanced Meteor Detect Settings" window which will allow you to place circles and rectangles of sensitive regions. For example, if you have a camera with a wide-angle lens pointed straight up into the sky, then you might want to create a circle about the center of the sky. Everything within the circle that lights up will trigger recording but things outside of the circle will not. So objects on the horizon that are moving (car lights, flashlights, etc.) will not trigger recording.
7. Press "Start" to begin making your movie(s).
This will begin making your movie(s).
8. Press "Stop" to stop making your movie(s).
If a file was open and images were being added, it will be closed. All other generated files will already have been closed.
9. View your movie
Use File/Open to open and view your new movie. Note that the slider will allow you to move immediately to any frame in the movie so you can rapidly scan what is in your file.