HandyAvi® - Astronomy Tutorial
Astronomical imaging with HandyAvi
Webcam astronomy is the easiest, least expensive way to begin doing astrophotography.
HandyAvi® is a webcam software application that provides complete control of your webcam or USB/Video adapter connected to your NTSC camera. It can also control a Meade® Telescope such as an LX-200 or Meade AutoStar or ETX scope.
Planetary imaging - What you need to get started
1. A Telescope
Could be almost any telescope but it helps if the telescope "tracks" the sky. Tracking helps keep the object you are trying to shoot (Jupiter for example) in the view field instead of drifting across the view field as the Earth rotates with respect to the sky.
The size of the captured images will of course depend on the focal length of the telescope. The telescope essentially projects an image onto the webcam's imaging chip.
Focal Lengths of various Meade telescopes:
ETX-60/70 AT 350mm ETX-90 EC 1250mm ETX-125 EC 1900mm LX-90 EMC 2000mm LX-200 10" f/10 2500mm The image projected onto a chip by the 10" LX-200 would be twice as big as the image projected onto a chip by the ETX 90 EC scope.
To increase the size of the projected image, one can use a Barlow lens (also known as a "telenegative" lens). These vary in magnification factor typically from 2x to 5x depending on which one you purchase. Use of a Barlow lens will increase the size of the image displayed and/or captured by your webcam. (We typically use a 2x Barlow with our LX-200 scope. We have a 5x Barlow and have used it successfully but it can be difficult to get the planet's image to fall on the chip. We use a flip-mirror to assist in making this easy.)
2. A Webcam or camera specifically designed for astronomical imaging
There are MANY choices here since so many different types of webcams are being sold.
Most amateur astronomers prefer cameras containing CCD chips rather than CMOS chips because the CCD chips tend to be more sensitive. Examples of webcams containing CCD chips include the Philips ToUcam 740 (no longer in production) and the Philips SPC900NC.
Cameras containing CMOS chips will work well in most cases. We often use a Logitech QuickCam 4000 here and obtain good results.
There are some cameras specifically designed for use with a telescope. For example, the Meade Lunar Planetary Imager and the Orion StarShoot Solar System Color Imager II. These cameras already have the "barrel" that allows you to insert them immediately into your telescope's eyepiece holder.
The camera normally will contain a DirectShow driver that HandyAvi will allow HandyAvi to interface with the camera.
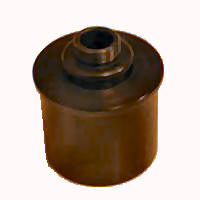
Webcam adapters for standard webcams
Most webcams not specifically designed for astronomy have their own small lens in front of the imaging chip and do not come with an eyepiece barrel.
Webcam adapters can be obtained from various sources such as:
This will show the list of adapters available for various webcams.
Here is what a typical webcam adapter looks like (this one is for the Philips SPC900NC):
There are instructions on the internet for removing your webcam's built-in lens and replacing it with the screw-in adapter.
Your webcam will come with a USB cable. One end plugs into the camera and the other end plugs into one of your computer's USB ports.
3. A copy of HandyAvi
Download and install HandyAvi. Use the 10-day free trial period to begin working with handyAvi.
After the 10-day free trial period expires, you will need to purchase a HandyAvi license. Install the registration key by running HandyAvi and choosing the Help menu item "Install Registration Key". (The "trial version" is the actual version of HandyAvi so no additional download will be necessary. Simply install the key.)
Shooting a Planet
1. Turn on your PC
2. Plug your webcam into your computer's USB port
3. Set up your telescope, i.e., align it and collimate it
Collimation is important for planetary imaging because the best image will be obtained when the telescope is collimated properly. Your telescope's manual generally contains information regarding how to do collimation.
4. Center a planet in your telescope using an eyepiece
A. Jupiter, Saturn, and Mars are perhaps the best planetary targets. Mars only makes a close approach every two years so Jupiter and Saturn are often the most frequently available targets. You can also shoot the Moon of course.
B. While looking through the telescope using an eyepiece, carefully place the planet in the center of the view field. Webcam video chips tend to be small so getting the planet's image to fall onto the video chip can sometimes be difficult. Use of a Flip Mirror will help but is not essential.
5. Now remove the eyepiece and place the video camera's telescope adapter (which should be screwed into your webcam) into your telescope's eyepiece holder.
6. Start HandyAvi if you have not already done so.
Make sure your webcam is plugged into one of your USB ports.
7. Select the menu item "Capture" and then the sub-menu item "Astronomy Images...".
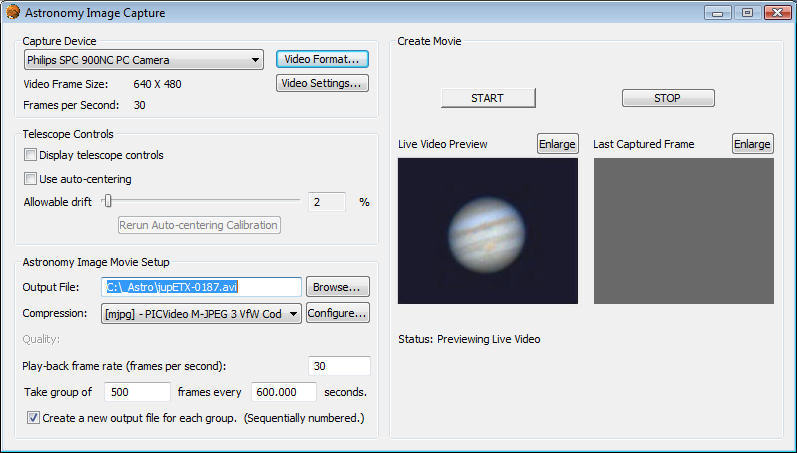
You should then see the "Astronomy Image Capture" panel:
Depending on how many cameras you have, you might need to select your "Capture Device" (webcam) from the pull-down item. (We selected the Philips SPC 900NC PC Camera for this example.)
Use "Video Format" to set the image size for your camera. (We selected 640x480 for this example.) The camera's "Frame Rate" can be selected in this panel. (We selected 30 frames per second for this example although slower frame rates such as 10 or 15 often provide better images.)
You should now see the planet in the "Live Video Preview" window assuming you have centered the planet so its image falls on the camera's chip.
You should now adjust the focus of the telescope so that the image in "Live Video Preview" is as sharp as possible.
Use "Video Settings" to access the camera's Brightness, Contrast, Saturation, etc. controls. You should set brightness so that no part of the planet is overexposed. The camera's frame rate can sometimes be selected from the Settings" panel in addition to its being selected in the "Video Format" panel. You should adjust the video settings so that you see the best possible images in the "Live Video Preview window. You can click "Enlarge" and adjust the image size so you can see in detail the quality of the images. When images are captured (using the Start button which will be described below) you want the best possible images to be captured.
Note that we bring up the camera vendor's "Video Format" and "Video Settings" windows. HandyAvi does not have its own settings windows for these because each camera is different and each camera generally comes with drivers that allow us to display the vendor's settings that are appropriate for their particular camera.
We will talk about "Telescope Controls" later. Telescope control is not essential for doing your imaging but it can help.
8. Set up for making your movie
The "Astronomy Movie Setup" section of the "Astronomy Image Capture" panel is where you control the actual movie-making operations.
First choose the name of your output file by entering a full path name such as the one shown in the example above. The Browse button will bring up a file selection window if you would prefer to use it.
Then choose your compression scheme or "CODEC" from the CODECs that exist on your machine (HandyAvi "enumerates" them and lists them in the pull-down.) A CODEC will "compress" each of your images, i.e., make them smaller. There is a trade-off between compression and fidelity. High compression makes an image fuzzier typically. However, you can achieve good compression without noticably affecting the image. Some amateur astronomers we know use "Microsoft MPEG-4 Video Codec", MP42. (We usually avoid "Cinepak Codec by Radius" because we have seen it behave badly.) More CODECs can be obtained and downloaded from the internet. Check out: http://www.fourcc.org. Also see the K-Lite Codec Pack that is available on the internet..
We usually use one of the MJPG compressors (such as the one from PicVideo) which compresses each image using JPG compression. You have to buy the MJPG CODECs via the internet though.
If you want images with NO compression you can use "Uncompressed". Your files will be very large if you use "Uncompressed" however.
Choose your "Playback frame rate". This will tell your movie how many frames per second to display if you choose to run your movie. (Normally you would be more interested in "stacking" the images in the movie to obtain one good frame from all of the movie frames rather than playing the movie.)
"Take group of M frames every N seconds". Enter the number of frames you want to capture on video and how much time to wait to capture another batch of frames. These settings can be used for example to capture 500 frames of Jupiter ever 10 minutes (600 seconds.) Each batch of 500 frames can then be "stacked" to provide one really good image every 10 minutes. These images can then be used to make a movie showing Jupiter rotating. You can make movies from still images in HandyAvi by using the Tools menu item and the "Make movie from still images..." submenu item. One of our movies of Mars rotating was created this way and was featured as an Astronomy Picture of the Day on the NASA website: http://apod.nasa.gov/apod/ap030826.html.
"Check" the "Create a new output file for each group" if you wish. This will create a new file for each group of images. A new unique name will automatically be created for each file. Putting your groups into separate files can simplify the image stacking process when you are ready to stack your images.
Note that Jupiter rotates completely in 9.8 hours so in 4.9 hours, the other side of Jupiter will be facing you. This means that if you space your groups 10 minutes apart, and create a new file for each, you will generate 29 movie files. If you create an image frame from each movie file by stacking its images, you will get 29 image files that will show Jupiter's face rotating until it's backside comes into view. You can take those 29 images and make a movie from them showing the rotation by using HandyAvi's "Make movie from still images..." tool. When we created our first Mars movie, we were very pleased with the results. If you have just one still image, it is hard to convince yourself that the features on your image are real but if it is rotating, it becomes VERY clear that the features are real! We were amazed by the results: http://apod.nasa.gov/apod/ap030826.html!
9. Press "Start" to begin making your movie(s).
This will begin making your movie(s). If your Meade telescope responds properly to RA and Dec Guide mode commands and if you checked the "Use Auto-centering" checkbox, HandyAvi will attempt to calibrate movement of your telescope and, if successful, will keep the planet centered in the view field of your camera.
10. Press "Stop" to stop making your movie(s).
If a file was open and images were being added, it will be closed. All other generated files will already have been closed.
11. "Stack Images..."
Use the Menu item "Stack Images..." to "stack" the images in each movie file. This will produce a high-quality still image that you can save as a JPG or BMP image.
Note that many amateur astronomers use the freeware program, RegiStax, for stacking even though HandyAvi contains an image stacking subsystem, "Stack Images..." under the Tools menu. RegiStax is excellent and has very advanced features such as sub-pixel registration and a wavelet post-processing feature.
Note that if you open a movie in HandyAvi, there will be a "Frame Selection" tool available under the Tools menu that will let you sort the images in the movie in order of best to worst images. You can then select the first 100 images or so, make a new movie from them and use that movie for image stacking. There is also a cropping tool to make a new movie with smaller images containing just the planet instead of so much dark space around it. Use of these features will reduce the image stacking time which can be significant since image stacking involves Fourier transform methods which are generally rather time-consuming.
12. Make a movie from your collection of stacked images if you wish.
If you have a collection of stacked images, i.e, a collection of JPG or BMP files that have resulted from processing a collection of movie files of a planet as it rotated, you can use the HandyAvi Tool "Make movie from still images" to make a movie showing the planet rotating. These can be quite revealing and will give you a much better appreciation for the planet's features.
13. View your movie
Use File/Open to open and view your new movie. Note that the slider will allow you to move immediately to any frame in the movie so you can rapidly scan what is in your file.
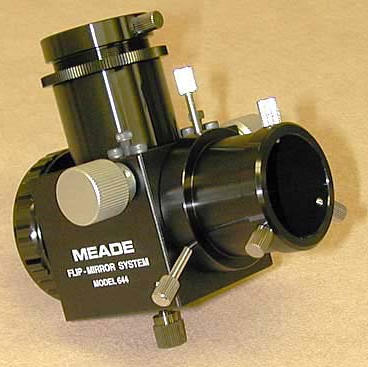
Flip mirrors
While not essential, some people use a "flip mirror" which provides two eyepiece holders, one for an eyepiece and one for the camera. The holder for the eyepiece can be adjusted so that the focus for the eyepiece is the same as the focus for the camera when the mirror is flipped.
This device contains a mirror so that you can center the planet using an eyepiece, then "flip" the mirror so that the image then goes to the camera instead of to the eyepiece. This allows the most convenient method of centering the image and of being sure that the image will fall on the imaging chip of your camera.
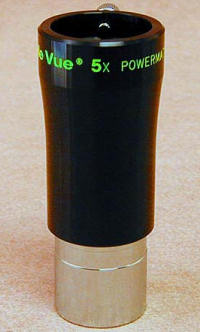
Barlow lens
Another non-essential but often useful item is a Barlow lens. The Barlow lens will magnify the size of the planet so that it appears larger on your camera's imaging chip and thus in the video image field that you will be viewing on your computer. Here are a couple of Barlow lenses:
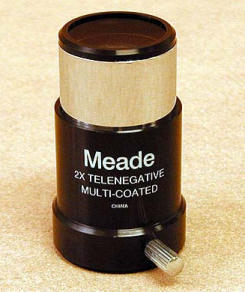
The 2X barlow will double the size of the planetary image. The 5X barlow will make the planet appear 5 times larger! Note that it can be harder to work with the 5X Barlow because the magnification makes centering the image a bit more difficult. We have used the 5X Barlow successfully however.